How to Create Trending Couple Lyrics Videos in VN App for Instagram Reels
Music playing… The evening feels magical, and so is life! Hello friends, how are you all? In today’s tutorial, I’m going to show you how you can create trending couple lyrics videos in the VN app — a style that’s currently going viral on Instagram Reels. Stay with me till the end, because I’ll guide you through every step to make your video stand out.
Step 1: Install and Open VN App
If you don’t have the VN app yet, head over to the Google Play Store and install it. Once installed, open the app. You’ll see a clean, simple interface. Click the ‘+’ button and select New Project.
Step 2: Select Your Photos
In the Photos section, select the images you want to use for your video. For best results, enhance your photo quality beforehand using apps like:
- Remini (AI Photo Enhancer)
- Magic Eraser (Background Removal)
If you don’t have good couple images, I’ll share some resources in the description so you can download high-quality ones. Once selected, click Next.
Step 3: Adjust Video Ratio
At the top, click Original and change the aspect ratio to 9:16 — perfect for Instagram Reels. This ensures your photos fit the vertical screen properly.
Step 4: Add Music
Your lyrics video needs to be in sync with music. Tap the Audio icon → Music → My Music. You can choose from your device library or extract audio from a video.
If your song is inside a video file, use VN’s PIP feature, select the video, then scroll down to find the Extract option. This will pull out the audio for your project.
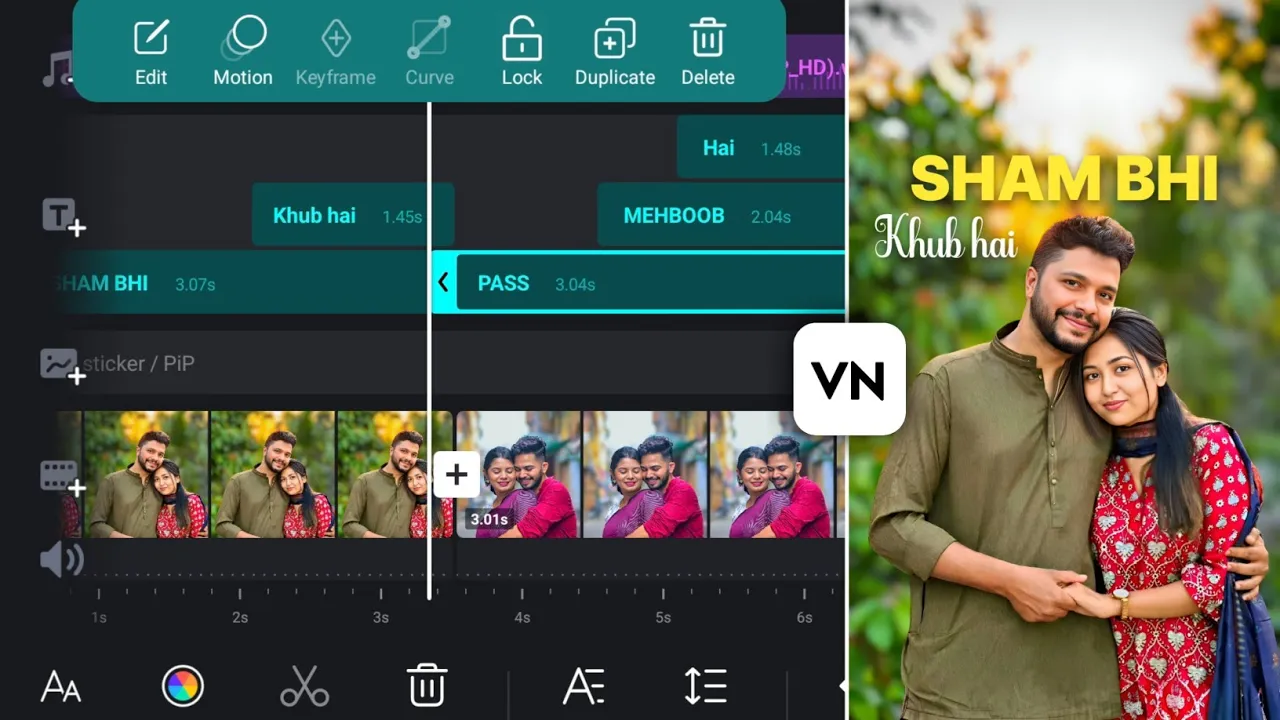
Step 5: Mark the Beats
Once your music is added, click on it and select Beats. Play the song and pause at every point where the lyrics change — for example, after “Shaam Bhi Khoob Hai” — then mark a beat. Repeat this for every lyric change. This will help sync your visuals perfectly with the song.
Step 6: Match Photos with Beats
Now, adjust your images to match the beats. Tap an image, extend or trim its duration so it ends exactly at the beat mark. Do this for all your photos until everything flows smoothly.
Step 7: Add Lyrics
Tap Text → Add a Heading and type your lyric lines. Write short phrases (2–3 words at a time) in uppercase for better impact. Select a bold font — I recommend using a Black or Extra Bold font style for clarity.
You can find free fonts on DaFont and import them into VN via the Import from File option.
Step 8: Style the Lyrics
- Choose a text color that complements your photo — yellow or white often works best.
- Add a shadow effect with black color, increase blur, and reduce opacity to make the text pop.
- Position the text where it’s visible but doesn’t cover important details.
Step 9: Add Motion to Text
Click Motion → Fade to create smooth text animations. Adjust the duration to your liking.
Step 10: Convert Photos to Black & White
To create a cinematic feel, go to Filters → Adjust, reduce Saturation to -100, and optionally adjust Brightness. Apply to all photos for a consistent look.
Step 11: Duplicate for New Lyrics
Instead of redoing text formatting for every lyric, simply duplicate existing text layers and replace the words. This saves a lot of time.
Step 12: Add Cutout Strokes
After exporting your video once, re-import it into VN, use PIP to add your original photos, apply the Cutout tool to remove backgrounds, and enable Stroke with a white outline. Add a fade motion for smooth entry.
Step 13: Final Zoom Transitions
Split your video at every photo change. Add Zoom In or Zoom Out animations via Motion and Transition. Apply these to all clips for a professional touch.
Step 14: Export Settings
For best quality:
- Resolution: 1080p or higher
- Frame Rate: 60 FPS
- Bitrate: Around 50 Mbps
Tap Export and save the final video to your device.
Final Thoughts
And that’s it! You’ve just created a viral-worthy couple lyrics video entirely in VN app without needing advanced tools like Alight Motion. This style works beautifully for Instagram Reels, TikTok, or YouTube Shorts.
If you found this guide helpful, check out these resources:
Keep creating, keep sharing happiness, and I’ll see you in the next tutorial!